Hi everyone,
Being involved in the E38 world, I am spoiled by having detailed write-ups of basically any repair or modification you can think of for those cars. I was having trouble finding any write-ups of the 6-series lowering spring install, specifically dealing with xDrive and also the Gran Coupe model. Recently I was quoted $1,100 to install the springs, so I figured why not give it a shot

. There were definitely times during the process I was thinking "Now I see why people charge $1,100 for this," but I was able to get the two front springs done with no special tools except a couple of free loaners from AutoZone. In all it took me about 5 hours for the front springs, but there was a lot of trial and error involved especially regarding the spring compressor placement. If you have any questions, or I missed something, please let me know!
**DISCLAIMER: I am a novice DIYer and if anything in here looks horribly wrong, then don't use it

Also not responsible for any use of this guide**
Tools Used
- Small dental hook (not completely necessary)
- Floor jack and jack stands
- Spring compressor set (free loaner from Autozone)
- Ball join separator (free loaner from Autozone)
- 1/2 in. breaker bar
- 1/2 in. 5(-ish)" extension
- 3/8 in. ratchet
- 3/8 in. 4(-ish)" extension
- 1/4 in. ratchet
- 1/4 in. 3(-ish)" extension
- Pass-through ratchet
- Pass-through 18mm socket
- 13mm 3/8 in. drive socket
- 14mm socket/wrench
- 18mm socket (for 1/2 in. breaker bar)
- 18mm crescent ratcheting open-end/box end combination wrench (just a simple open end wrench works fine also)
- 21mm crescent ratcheting open-end/box end combination wrench (just a simple open end wrench works fine also)
- Torx T-40 bit/driver
- Towel/rag
- Mechanics gloves (recommended!)
Steps
1) Find a suitable location that is level and gives enough room to work. Loosen the lug bolts on the wheels. Jack the car up from the center jack-pad between the front wheels. Place jack stands under the jack pad locations under the front doors. Remove lug bolts and wheels. I set the wheels under the front bumper as added security from any unexpected falls!
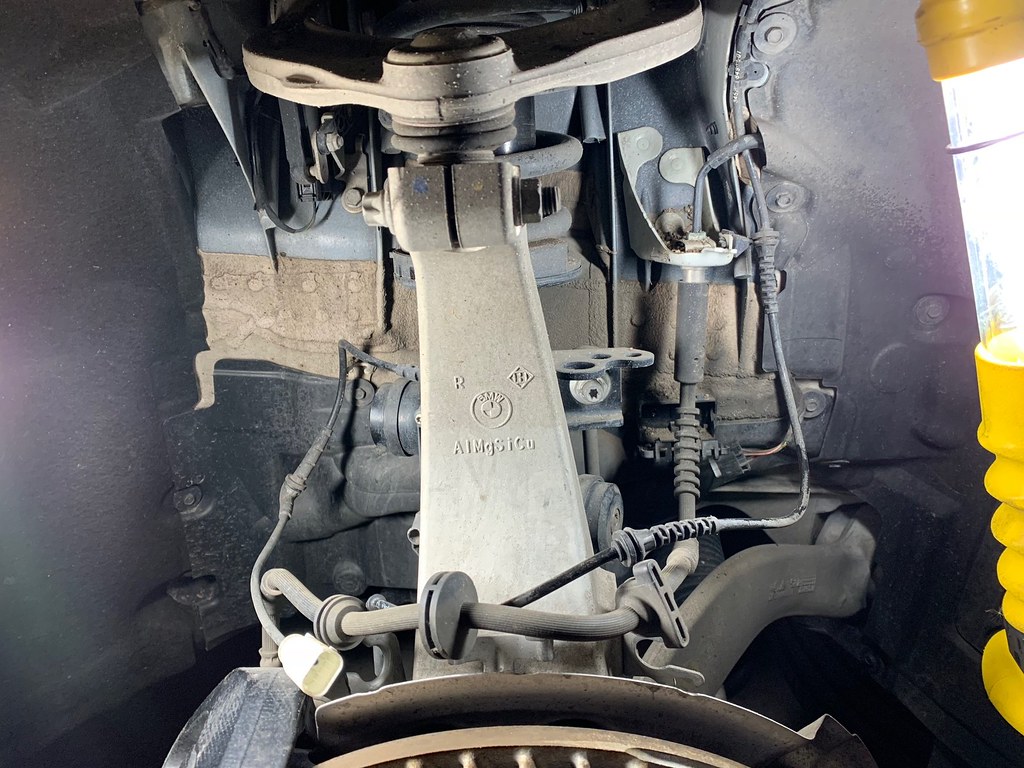
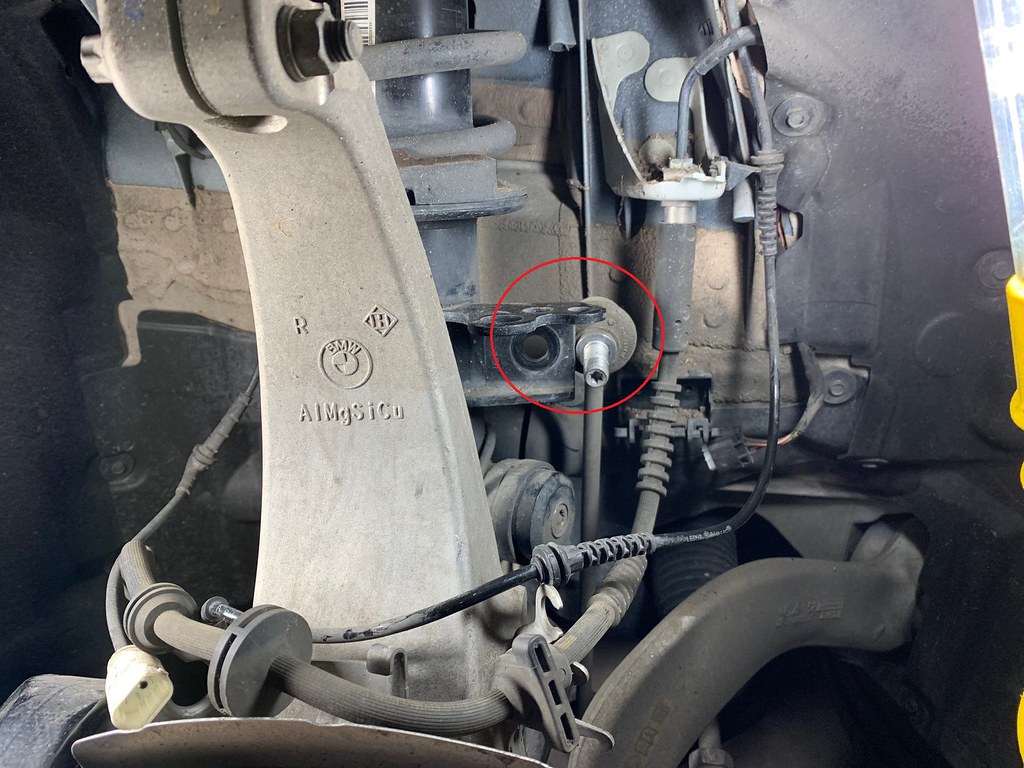
2) Using your hand or a dental hook, remove the hoses and wires shown below in red circles from their attachment points along the suspension. The red box on the right houses an electrical connection that must be separated (the write connects to the strut). *NOTE* This picture is of the passenger side. The driver's side is identical except there is an additional wire running parallel along the long wire on the right side of the picture, and disconnects similarly.

This is how the wires and hoses look disconnected from their anchors. Other than the connection in the red-squared box, nothing else needs to be disconnected.
3) Loosen the 18mm nut holding the sway bar to the strut. It takes quite a bit of force.
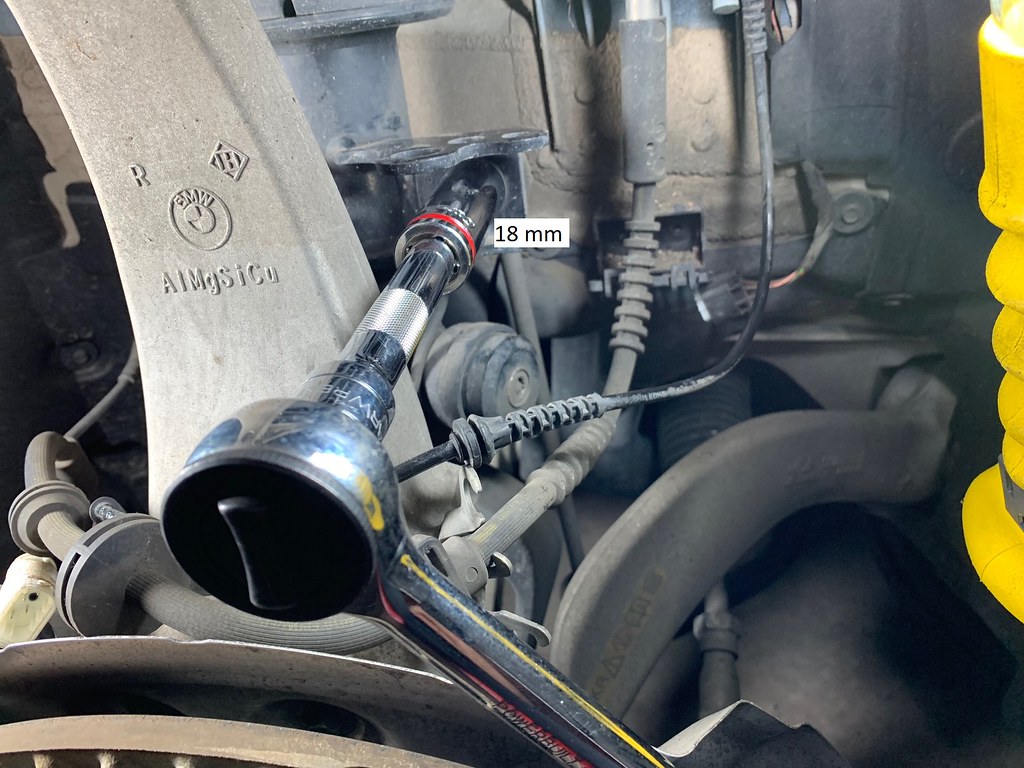
4) Once the nut breaks loose, use the 18mm pass-through ratchet to continue loosening it.
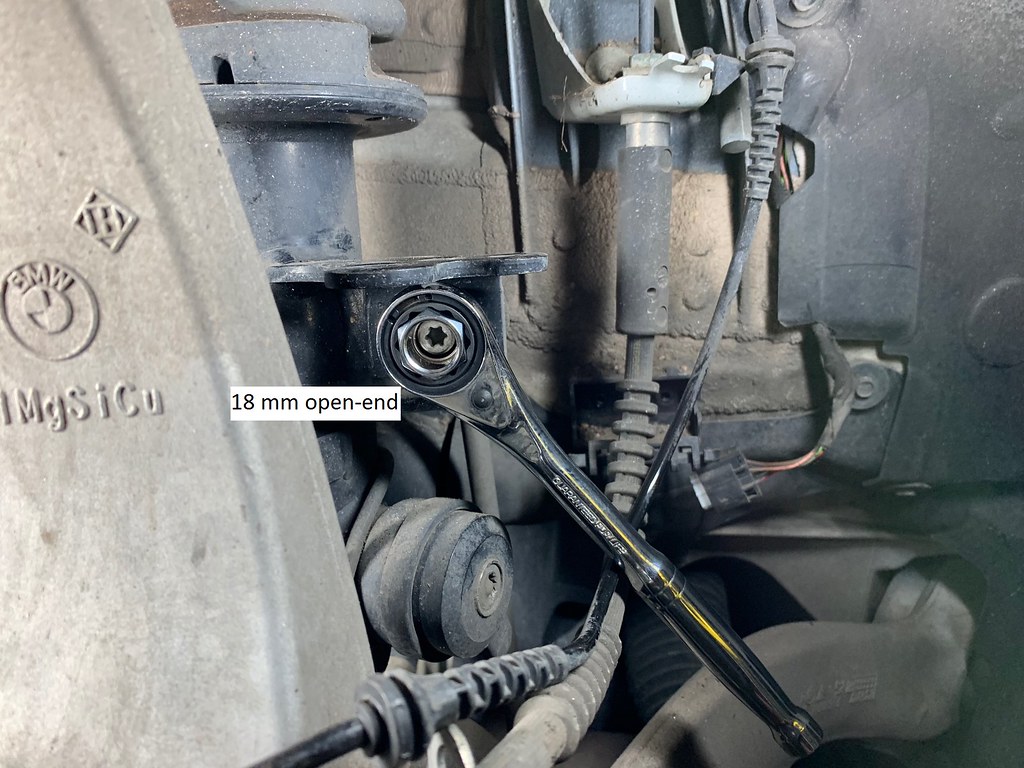
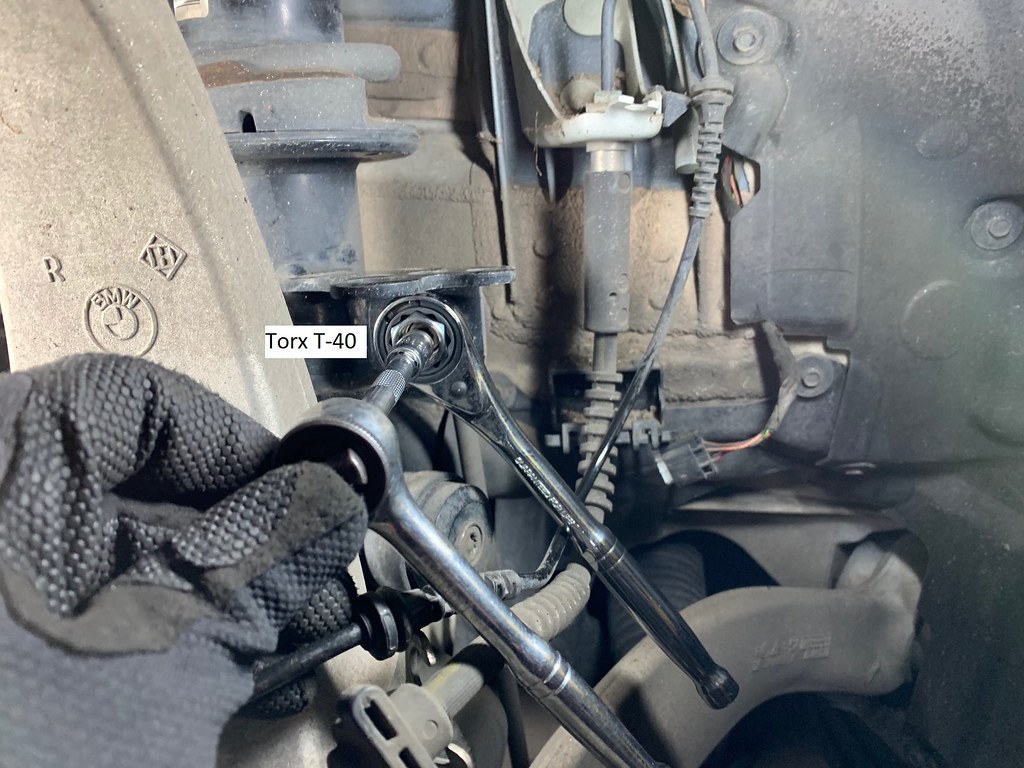
If the inner Torx part begins to spin with the 18mm nut, you will need to use a Torx T-40 bit/driver to hold it in place and only spin the 18mm nut.
5) Push the swar bar link out the back of the strut. I did this later in the process on my first side, and it was a pain to move the carrier/hub assembly around to get the link to line up with the strut so it could be pushed out. Just push it out once it is loose.
6) Use an 18mm socket and breaker bar on the bolt connecting the bottom of the strut to the lower wishbone. The 18mm side is towards the front of the car. This was the hardest part to break loose so I would recommend a breaker bar and not ruining a ratchet. I literally had to step on the breaker bar to loosen this.
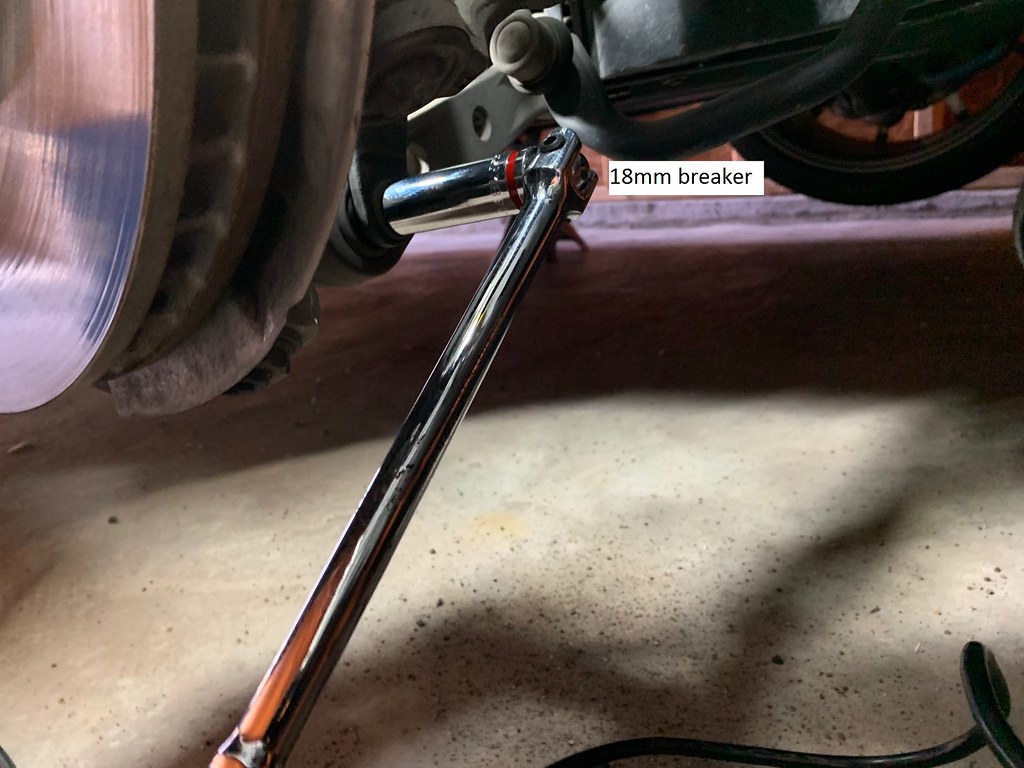
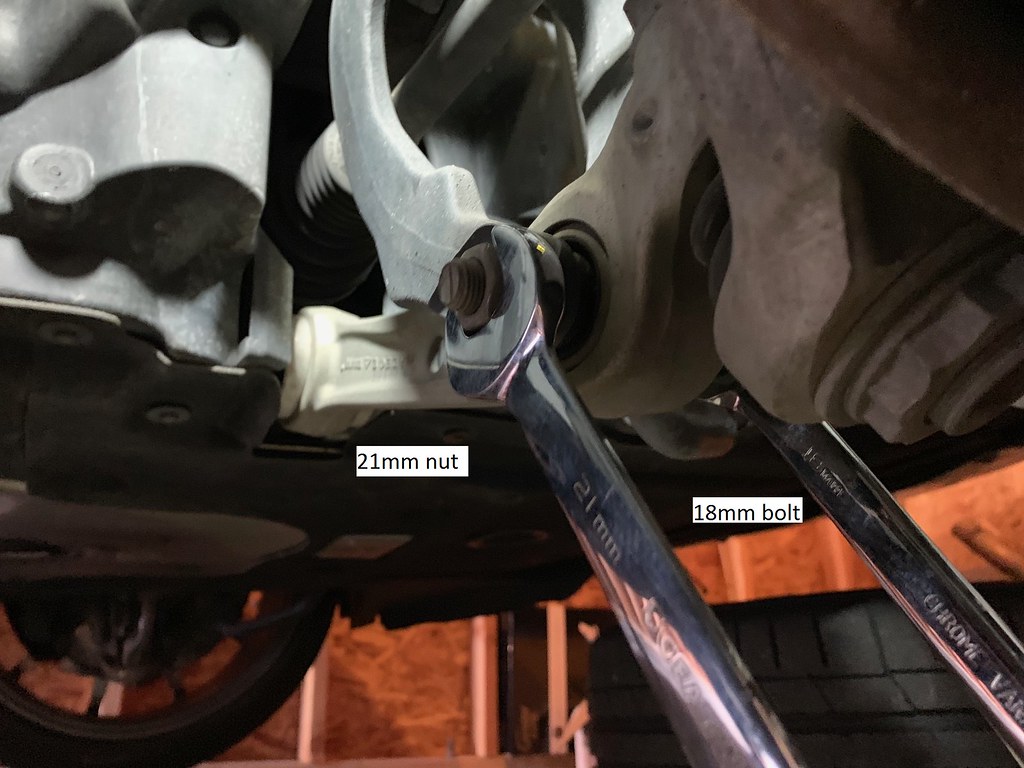
7) Once the bolt has loosened, use a 21mm crescent and/or ratcheting wrench to hold the nut towards the rear of the car, and continue loosening the 18mm bolt from the front with a crescent and/or ratcheting wrench. Both my wrenches ratcheted which made quick work of removing the bolt once loose.
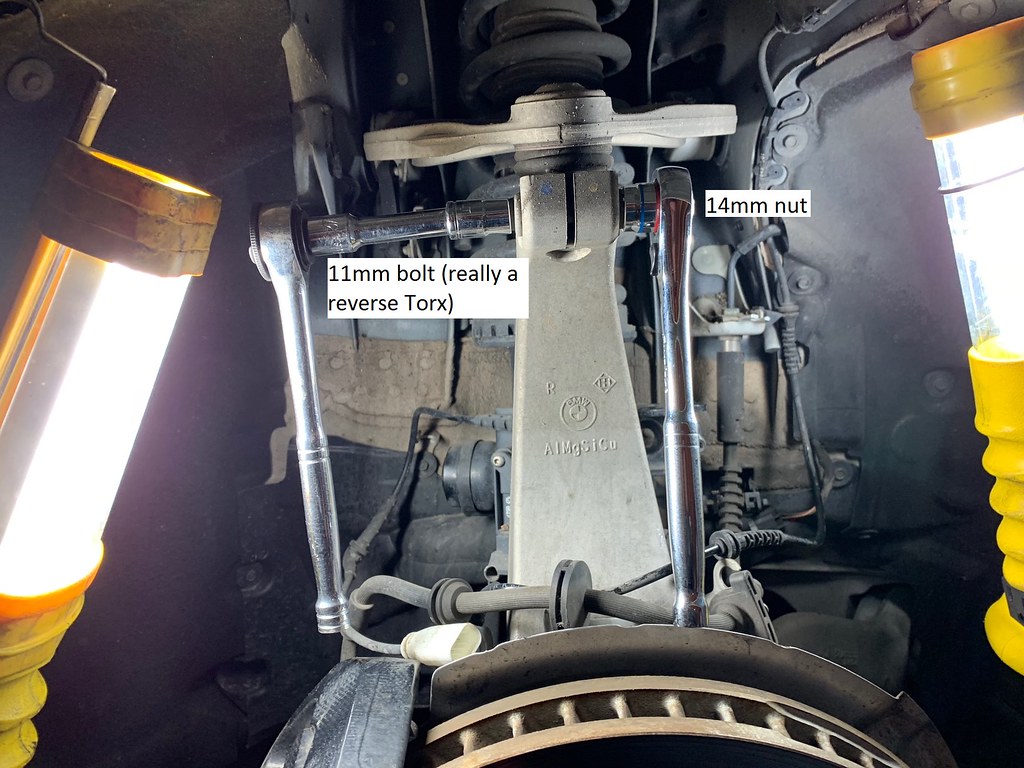
8) Next undo the top wishbone from the carrier by using an 11mm socket to hold the bolt (in reality it is actually some sort of reverse-Torx/star shaped bolt. See the first photos above.) Loosen the nut towards the front of the car using a 14mm socket. Once the nut is off, I have seen videos of people pounding out the bolt with a pick. I found just continuing to unscrew the bolt with the 11mm socket until it was completely out worked as well.
9) Once the bolt is out, use a ball joint separator is needed to separate the upper wishbone from the carrier. On my passenger side, the wishbone separated almost immediately. On my driver side, I needed to use a lot more persuasion with the separator.
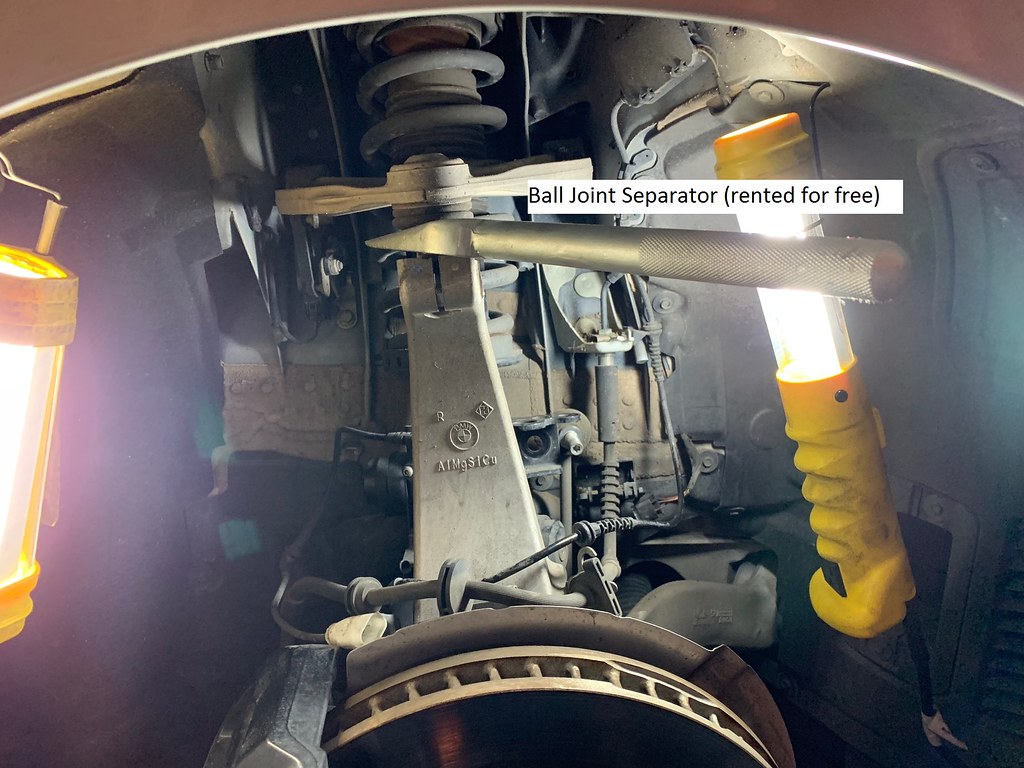
Once the ball joint is separated, you will be able to move the brake assembly around to assist when removing the strut.
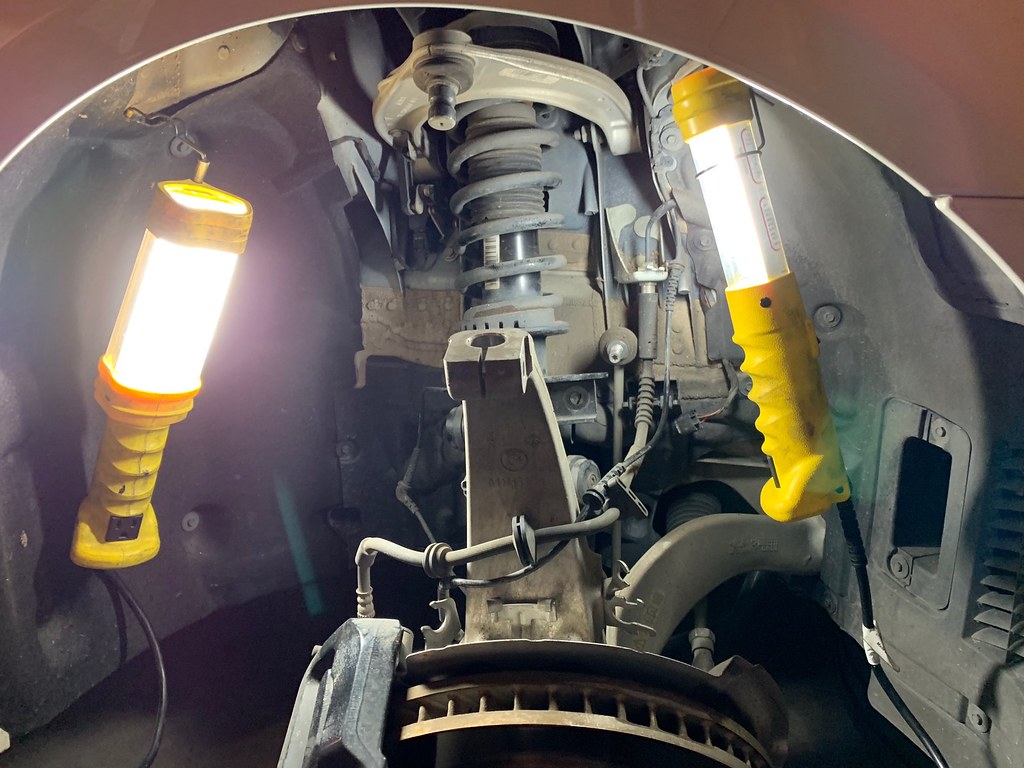
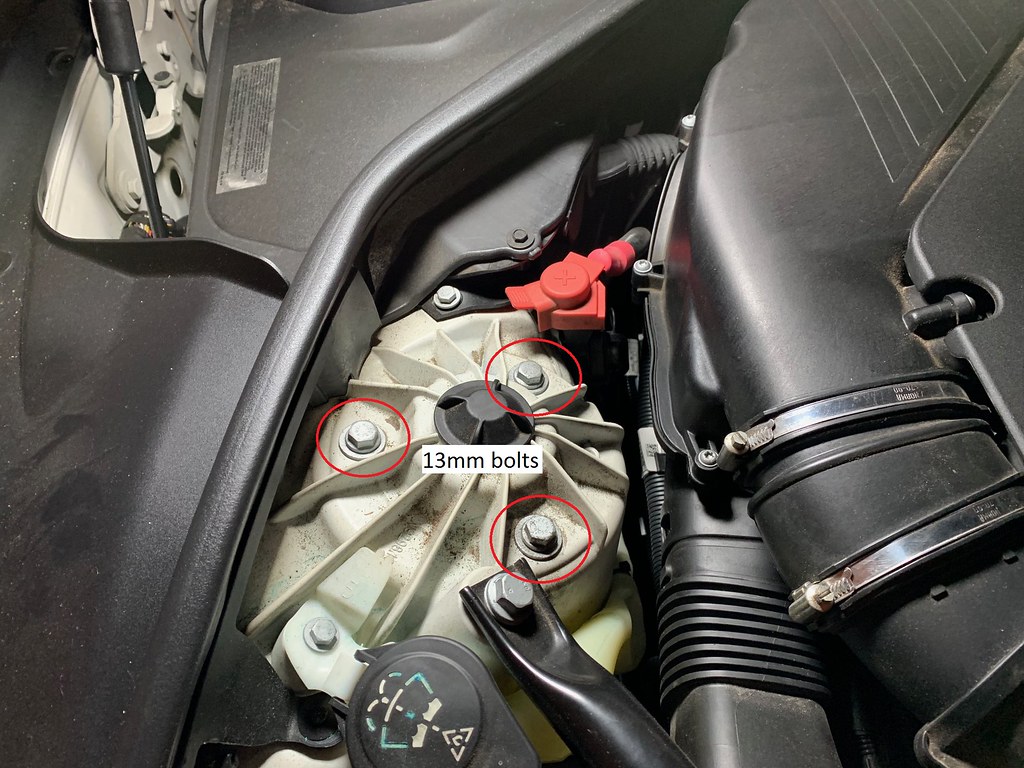
10) Open the hood and remove the three 13mm bolts attaching the strut to the strut tower.
11) Remove strut from the vehicle. Sounds easy, right? Sort of. You'll need to push the upper wishbone up as far as you possibly can, while also using your foot (or a friend, in my case my wife), to push down on the brake hub. You need to be careful of how hard you push down on the hub, as the brake lines and electrical wires are still connected, remember? That's why we took them off their anchors earlier - to give a little extra slack in them to be able to push down the hub. I found wiggling the strut off of its lower mounts, then tilting it towards the back made for the easiest exit. Cover the top with a towel so you don't scratch your paint as you slide the top under the wheel well.
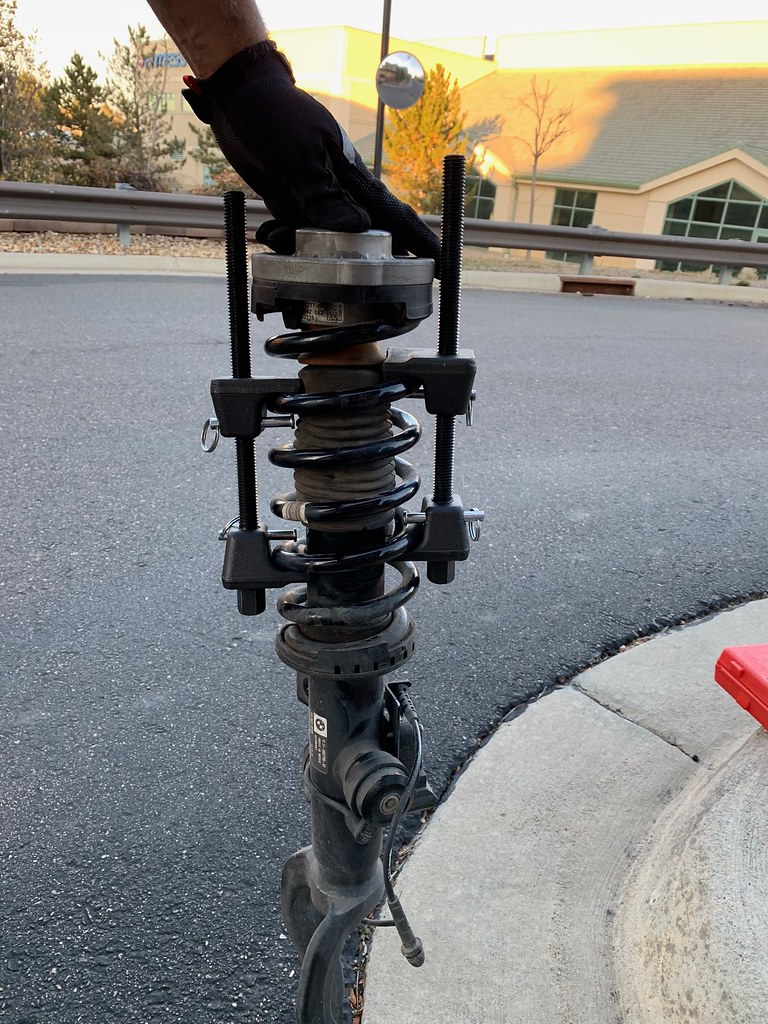
12) With the strut free of the vehicle, attach spring compressors to the coils as shown below. I've heard both "Always have the nut at the top!" and "Always have the nut at the bottom!" so
this is how I did it.
**
USE EXTREME CAUTION WHEN USING SPRING COMPRESSORS** The point here is to compress the springs enough so that you can undo the nut on the top of the strut. If you were to just unscrew that nut without compressing the springs, the top mount would simply shoot off as soon as the nut came off and could injure you. However, compressing the springs puts a lot of potential energy into them, so do it slowly and evenly. I found that 20 half-turns (alternating 5 half-turns per side) got the springs compressed enough that I could remove the top nut with a very minimal "pop".
Here are the springs compressed 20 half-turns per side. Remember, there is a lot of energy stored up there so don't mess around with it too much before you loosen the top nut.
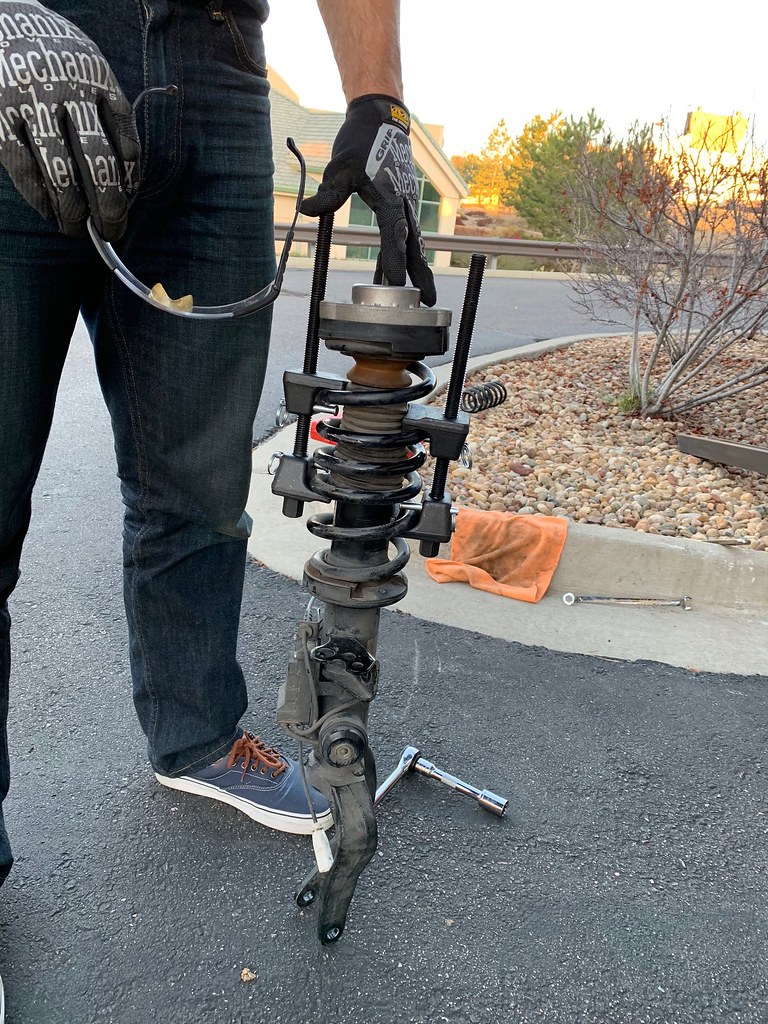
13) Lay the strut on its side and loosen the 18mm nut on top. Go slowly and be prepared for a little pop once the nut is fully loose.

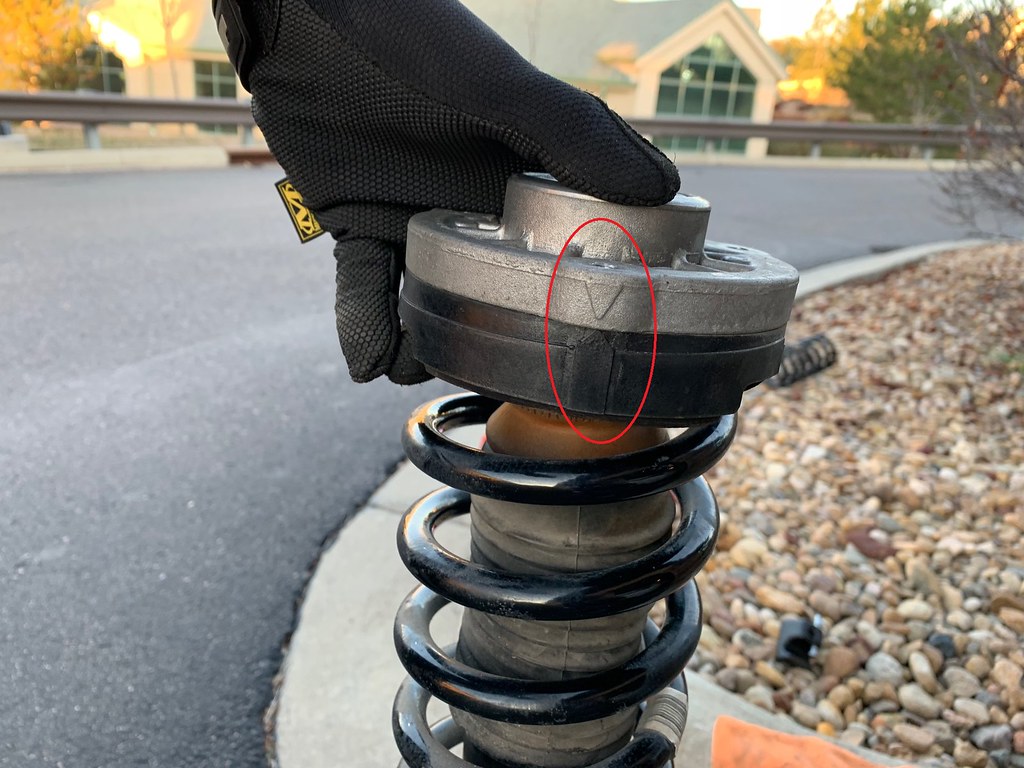
14) Once the nut is loose, set it aside and remove the upper strut mount. If the silver piece separated from the black piece, there are arrows showing how to line them back up. (Ask me how I figured that one out...)
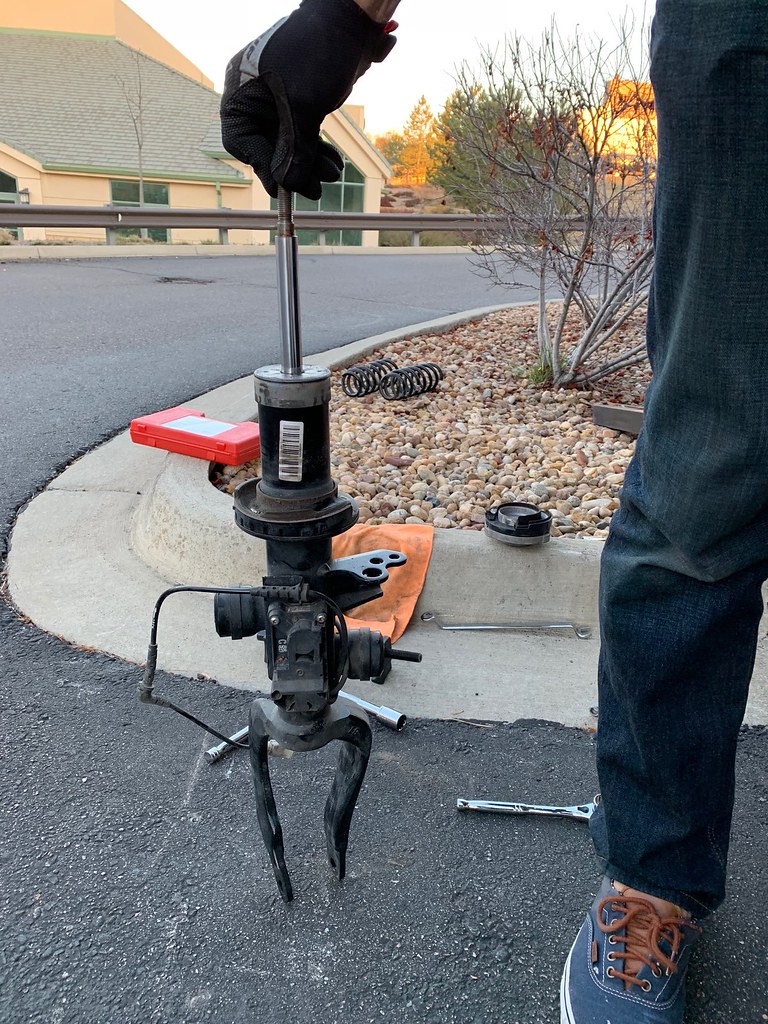
15) Remove the spring and bump stop and bush. Here is how the strut looks naked and ready for the new springs.
 *LEARN FROM MY MISTAKES TIP*
 Installing and compressing the new springs was by far the most time consuming part of this project for me, probably because I did it in that order. Instead, I should have (and eventually did) compress THEN install them. The H&R springs are ever so slightly smaller than the stock springs, so the spring compressor wouldn't "catch" on the coils without getting hit by the fat black part of the strut.
Long story short, compress the new springs while they are completely off the strut. You can see in the picture below where I attached the spring compressors on the H&Rs. It takes many more turns to compress the springs enough to get the top mount on than it did to take it off, so you'll need to put some muscle into it. Again, beware the potential energy, go slow and make sure nothing is able to pop loose or off. Also in the picture below you can see the very bottom end of the spring up against a designed stopper.
Make sure the spring is lined up correctly with the detent!

As you can see, I lost daylight fighting these compressors. Doing them up just to have to completely loosen them again takes a long time with no power/air tools.

The picture above shows enough thread at the top of the strut to poke through the top strut mount and be able to start the nut on.
16) Place the rubber bush and bump stop over the silver pipe of the strut, inside the spring. Then put the upper strut mount back in place. Again,
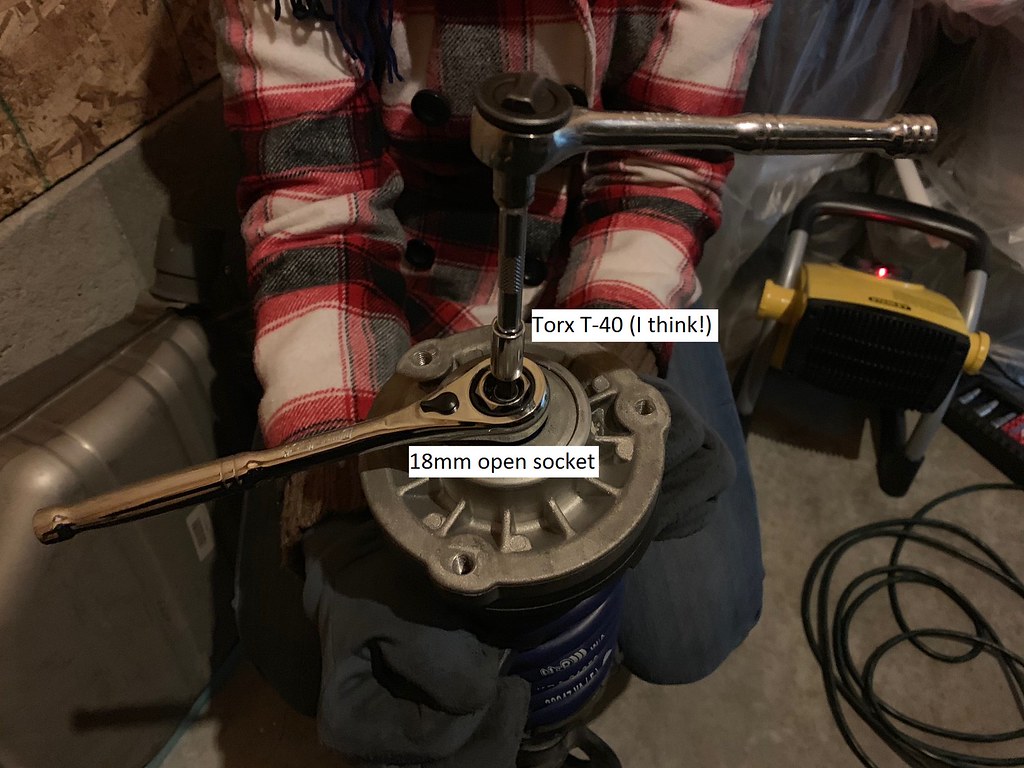
there is a specific detent built into the strut mount that needs to line up with the end of the top coil, just like the bottom. Make sure this is correct. Then, get the 18mm nut started to hold the top mount on. Now that everything is loose, the Torx opening on the strut itself might spin with the 18mm nut. One side of mine didn't, the other did. I
think the Torx was T-40 but I am not 100% sure. Either way, like the sway bar link earlier, you'll need to pass the Torx through the 18mm socket and hold the Torx in place while tightening the 18mm nut.
17) Once the top strut mount is securely in place (about 3/4" to 1" of thread was sticking out of my mount), you can carefully remove the spring compressors.
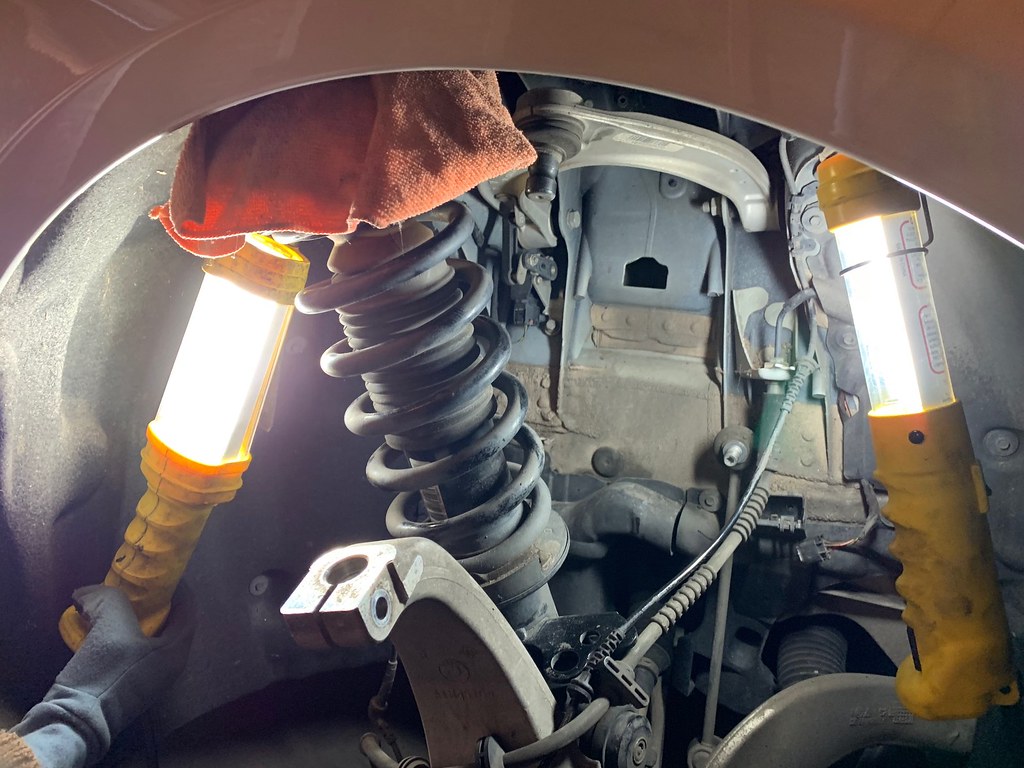
18) Install the strut with new spring in reverse order of the removal.
TIPS FOR REINSTALL
- Put the strut back in the wheel well the same general direction it came out. Again you'll probably have to push down on the brake hub, just be careful of the still-connected lines.
- Once the strut is back under the car, attached it at the top with the three 13mm bolts first. It makes everything much easier to align this way.
- You may need to twist the strut back and forth with a decent amount of pressure to get the bottom of the strut to align with the holes in the lower wishbone.
- Support the brake assembly with the floor jack if needed. I found this helped to align the strut and the lower wishbone connection.
- Once the lower bolt is in, use the floor jack to raise up the brake/hub assembly. Make sure you torque down the lower and upper wishbone connections with the hub close to the future "ride height" to reduce stress on the bushings that would result from torquing them under full wheel droop.
- The upper wishbone can be hard to pull down into the hole on the carrier. Just keep at it, it will line up eventually.
- I needed to use a mallet to get the upper wishbone connection fully seated in the carrier. There isn't much room to swing above the wishbone, but it didn't take much.
- Be ready with the bolt to go through the carrier/upper wishbone connection. I was fumbling around for it and the wishbone popped out of the carrier while I was.
- Remember you'll need the pass-through wrench/Torx to get the sway bar link reattached as the Torx will be spinning with the nut.
- Don't forget to reconnect the electrical connection to the strut, as well as reconnect the other wires and lines to their anchor-points.
I hope to have the rear install and write-up done tomorrow!